Many houses have 8 to 10 feet of land on one side or the other between the house and the property line. Garden homes or town homes often have a narrow, fenced plot of ground in the front or back. These areas can be challenging to landscape because the space has awkward proportions, and sunlight may be scarce if there are adjoining houses. Proper planning and experimentation with different plants and gardening techniques can create stunning gardens in these often under-utilized areas. Narrow Space Landscaping IdeasEspalier a Tree or ShrubThis space-saving method of training a tree or shrub to grow flat against a wall or fence adds a classic, old-world touch to a small garden without using up valuable ground space. Espalier designs may be casual and free flowing or structured and formal according to taste. Slow-growing plants such as sasanqua camellia keep pruning to a minimum and make ideal plants for espalier. Fruit trees are popular choices for this technique, but they require a considerable time commitment. Boston or English ivy, climbing roses and wisteria are also suitable for espalier and may be easier to manage than a shrub or tree. Once the plant is established in its pattern, only routine pruning is necessary to remove stray stems or branches.
To learn how to espalier a tree, check out this article from Oregon State University
Plant Columnar TreesColumnar trees are tall and narrow. They do not spread the way other trees do. For this reason, they are useful in small spaces. There are a number of choices available in deciduous and evergreen varieties. Deciduous varieties such as columnar hornbeam, Dawyck purple beech and columnar oak have dense winter habits. Evergreens such as incense cedar, Italian cypress, Hoops blue spruce and columnar Scotch pine provide year round foliage. A row of columnar threes looks spectacular against a wall or when used as a privacy screen.
Know how to prune your columnar trees
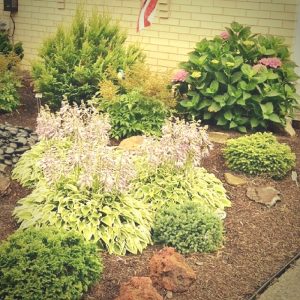
Plant Low-maintenance Perennials
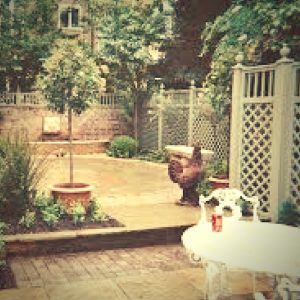
Once larger elements of the garden are established, add perennial and annual plants. Choose hardy plants that are tolerant of varying light conditions and that do not require excessive watering. Aspidistra, the cast iron plant, and Liriope muscari are two such plants. Both come in green and variegated varieties and add interesting color and texture to a garden. They are not fussy about light or water and grow well in most USDA planting zones. Both are useful as foundation plants or borders. Small evergreen shrubs such as dwarf azalea, arborvitae and English boxwood are excellent additions to a diminutive garden. They are easy to grow and can be kept small with minimal pruning. Use them as foundation plantings or borders. Consider ground cover plants such as ajuga, which comes in several attractive variegated types, or one of the creeping junipers to add a low, textural element to beds. Add AccessoriesThe addition of a garden seat, an arbor, an attractive old gate or a small water feature can create an appealing vignette in a narrow space. An informal path of stepping-stones is both useful and decorative, especially when it leads the way to a scenic, albeit small, setting. A vintage bench beside a splashing fountain creates a restful ambiance and provides a place to enjoy a cooling drink and a moment of contemplation. Birdbaths, birdhouses and small statuary are appropriate for small gardens.
Check Out: 10 Ways to Accessorize Your Home Garden
Consider it a ChallengeNarrow gardens can become very special places. Think of New Orleans’ famous alleys and courtyards, many of which are nothing more than tiny slivers of land wedged between buildings with little room for planting. Undaunted, French Quarter gardeners pack climbing vines, foliage plants and flowers into every nook and cranny. The result is calculated, horticultural chaos, but no one would ever think of these delightful retreats as anything less than charming. The post 4 Tips to Landscape a Narrow Space appeared first on All around the house. from http://allaroundthe.house/narrow-space-landscaping/
0 Comments
Bathrooms can be a haven of relaxation, however if mildew is growing, counters are overflowing, and hair and dust balls line the floor, the idea of lingering in this room is not appealing. Even if the idea of a clean bathroom is appealing, the idea of a three or four-hour cleaning regiment might not be the motivation needed to complete the bathroom’s spring clean. Instead of trying to complete the cleaning project in one day, spread the chore over several days in 15-minute segments.
Daily Bathroom Cleaning ScheduleThe first day
The second day
The third day
The fourth day
The fifth day – Enjoy the sparkling clean bathroom. Bathroom Cleaning Tips
Successful Completion Depending on the size of the bathroom, this four-day cleaning schedule can be completed in about an hour, so this project could be completed in one day. However, for those who hate to clean, an hour of cleaning is not appealing, making it easy to procrastinate. For larger bathrooms, large closets, or lots of drawers and shelves, the 15-minute segments may have to be increased to accommodate the additional space. However, using the four-day project schedule helps keep the load lighter and doesn’t seem as overwhelming. The shorter time frame makes it more likely that the job will be completed. When planning the deep clean, it is important to look at the week’s schedule. If several evenings are already planned, then put it on the calendar so that meetings or events don’t interrupt the commitment to make the bathroom more user-friendly and germ-free. The post How to Give Your Bathroom a Deep Clean in 15-minute Segments appeared first on All around the house. from http://allaroundthe.house/spring-clean-bathroom/ One should be aware that plants properly placed in our landscapes can save both energy and dollars. As you plan your landscape or add to an existing landscape, consider locating plants where they will save energy and money. Windbreaks have long been used on farms to help divert wind and control conditions. Even in the home landscape, a small planting to divert the wind can be beneficial. Evergreen plants placed to the north or northwest of a home to break the prevailing wind can reduce heat loss and fuel consumption. Where adequate space is available, several rows of trees may be used. However, in a limited area only a few are still helpful, although less effective. Where adequate space is available, the ends of a windbreak should extend 50 feet to each side of the area to be protected. A windbreak is effective for eight times its height, so even before the plants become as high as your house they will provide beneficial effects. Pines can be used for windbreaks, but because they tend to get thin at the base, a combination with junipers or other denser evergreens makes them more effective. Even though the evergreens we plant along the front sides of our homes are usually considered for appearance only, they actually create a dead air space between them and the wall which provides added insulation and wind protection. The Japanese yew is one of the best plants for foundation windbreak planting. All large evergreen trees should be restricted to the north or west sides of the home. However, in addition to their winter wind-breaking ability, the summer breeze coming through evergreen trees seems particularly cool and refreshing. The deciduous trees that lose their leaves each fall are best suited for planting on the east, south and southwest of the home. Large trees are especially useful for Rome temperature control when located on the southwest corner of the home. In this location, a large tree or several trees shade the home during the hot summer afternoon and reduce energy consumed for air conditioning. Even without air conditioning, trees in this location still make the home more comfortable.
Areas under trees are quite shaded, plant a shade garden with color and style
A tree shading the sides or roof of the house will be seven times more effective in reducing heat in summer than pulling heavy drapes over the windows while the sun is shining on them. As water evaporates from the leaves of the trees, a natural cooling also occurs. Large trees, such as red oak, sugar maple, ash or cypress might be considered for this purpose. After the leaves fall, the sun’s rays warm the walls during cold weather. Where there is no room for large trees to shade the west or south walls of a home, vines either climbing directly on the wall, or on large trellises can also be used to shade the wall and help reduce energy consumption. Use vines that do not keep their leaves all winter so winter warming by the sun’s rays will be beneficial. Some possible choices are Boston ivy and Virginia creeper to cling to walls, or wisteria and bittersweet to twine on trellises.
Learn more about energy efficient landscaping on Downtown Homestead
3 Eco-friendly Landscaping IdeasSolar Powered Lighting for your GardenThese ingenious devices can either be placed in the ground or attached to a fixture. They charge their individual batteries during the day, in sunlight. At night, they illuminate, providing dim but comfortable lighting which is sufficient for garden paths or footpaths leading to or around your home. During the summer, a full day’s charge can keep these lamps powered until sunrise. In the winter, the shorter charging period means the lights will only be on till about 3 in the morning. But that’s okay, because you’ll be fast asleep. On the up side, these lamps consume absolutely no power from your house’s mains. Meaning lower electricity bills. Furthermore, they are individual units, meaning no wiring is necessary. Also, some of these lamps have a green design, meaning it is made of recyclable material. Eco Friendly Water FeaturesIt is not true that all water features are a waste of water. Traditional water features are. But eco friendly water features are not. Eco friendly water fountains incorporate a number of notable features. Firstly, they waste less water. Most fountains which spray jets of water tend to lose most of the water to evaporation. Eco friendly fountains, you will find, allow water to flow down a surface – thus reducing the effects of evaporation. Secondly, they are solar powered and energy efficient. Therefore they require no mains electricity to run. Collecting WaterThe biggest concern with water features is that they are not eco friendly because of the wastage of water. The solution is simple and straight forward: collect rainwater. Simply put a receptacle, a bucket or similar container, at the end of your roof gutters. It is advisable to put a sieve over the receptacle to prevent large particles from entering the water. If you want something that has a decorative appeal, try using a big jar or vase in place of the pail. The water can also be used for other household chores such as washing the car, watering the plants or cleaning the driveway. However, be sure to prevent mosquito from breeding in the water as dengue fever, carried by certain breeds of mosquito, can be fatal.
Check out this post on Downtown Homestead to learn more about collecting water
The post Landscape Ideas to Save Energy appeared first on All around the house. from http://allaroundthe.house/landscape-ideas-to-save-energy/ Whether you are installing ground covers or planting a new flower garden, soil preparation is often a major hurdle. Not only do you have to eliminate weeds and/or lawn grass, but you also need to spread organic matter over the site and dig it in along with other soil amendments. Spreading compost and digging it into the soil is a major workout, and is great exercise, but it can be very bad for your back. By planning ahead and waiting a few months between preparing and planting, it’s possible to eliminate most of the back-breaking work. No-dig Supplies and SchedulingAt the very least, you’ll need a pile of newspapers and a pile of mulch such as shredded bark or bark chips to use this method. If your soil is extremely clayey, compacted, sandy, or poor, add a generous supply of compost and even some topsoil to the list. Watch the weather, too. You are going to be spreading newspaper, so select a day when it isn’t too windy. Use this smothering method any time, but you’ll need to plan on waiting several months before planting. Smother a bed in midsummer for fall planting, for example, or in fall for planting the following spring. Start by marking the boundaries of the garden bed you are installing. Use stakes and string, or outline it with a hose. Step back to examine the size and shape, then adjust it if necessary. If you already have a fairly clear idea of where the new garden is going to go and what shape it will be, you can also skip this step and just start dealing with the weeds. Just be sure to check the shape of the final garden and adjust it if you need to. If there are tall weeds or grass on your site, set your mower to as low a setting as possible and cut them down.
Check Out: Top Vegetable Picks for Your Home Garden
Smothering WeedsThe goal is to spread a thick layer of newspapers topped by a thick layer of mulch. The best way to accomplish this is to spread the newspaper in sections using scoops of mulch to keep the newspaper from blowing away. A layer of newspaper 8 to 10 sheets thick will eliminate lawn grass and most weeds. Use a thicker layer if you have especially vigorous weeds on the site. You can also use cardboard, but that will take longer to rot, making the interval between mulching and planting longer. Use only the sections printed on uncoated (not shiny) traditional newsprint. (Recycle the glossy advertising sections.) Lay down a section of newspaper, then toss a shovel full of mulch in the center to hold it down. If there is enough wind to cause the newspapers to flap around, temporarily flatten them even further by spraying them with water from the hose. Continue laying down newspaper sections and weighing them down with mulch until you’ve covered the entire site. Be sure that the newspapers overlap one another so they cover the site completely. When spreading, you can simply use folded sections of newspaper (about 11½ inches by 22½ inches) or open up the sections (23 inches by 22½) to cover more space with each section. You may find it’s handy to open up all the sections of the newspaper you’re going to use and stack them before carrying them out to the garden. Then count out eight or ten sheets to spread at a time. After covering the site with newspapers weighed down with piles of mulch, cover the rest of the site with a 3- to 4- inch layer of mulch. Then leave the site for at least 3 months before planting.
Check Out: Laying Out and Planting a Vegetable Garden
No-dig Soil ImprovementYou can improve any garden soil—completely organically—using this method. Mulch alone works fine on a site with acceptable soil, but plan on adding more layers if you want richer conditions for your plants. Adding additional organic matter is also a great idea if dry shade is a major problem in your garden. Start with a layer of newspaper, then top it with any of the following: topsoil, compost, well-rotted manure, chopped leaves, or other readily available organic matter. You can make the layers as thick as you like. A garden mulched really thickly is often called a lasagna garden. To give the garden a finished look, top the site with mulch. Then just wait. The majority of weeds underneath all that newspaper, mulch, and organic matter will simply rot. If you do see weeds, either pull them or rake back the mulch, cover them with more newspaper, then replace the mulch. Another thing that happens during this process is that beneficial soil organisms like earthworms begin to stir up the layers. They’ll take organic matter down through the newspaper layer, and bring up soil from below. Keeping the pile well watered hastens the process. The end result is lovely weed-free garden soil that’s ready to fill with flowers, ground covers, or other treasures you would like to grow. What better use for newspapers that need recycling? The post Build Great Garden Soil the Easy No Dig Way appeared first on All around the house. from http://allaroundthe.house/no-dig-garden-method/ When it comes to home improvement plans, bathroom renovation projects are usually at the top of the list. Bathrooms get renovated more often than the other rooms, because it is the most frequently used room in the house. Bathroom renovation is not only when you want to sell your home. A renovation project can increase the value of your home and improve the quality of your life. It also gives you a comfortable bathroom where you can be relax and refreshing yourself. It can be a boring task, but a little planning could help your life much easier later on. In this article, you will learn how to transform your old bathroom to its new look. 9 things to take into account when choosing a new tubHow much space do you have? Today bathtubs are also designed to accommodate two people instead of just the more common bathtub for one. They are larger simply because they are roomier. Homeowners should consider the available space in their existing bathroom first before selecting an option to purchase a two-person bathtub. If the inclusion of a tub this size cuts down on the roominess of your bathroom, you might want to opt not to purchase it. How much money can you afford to spend? The type and model of a bathtub that you purchase will determine the price range that you can expect to pay. The standard tub is by far the least expensive tub. The more features or custom designs that you add to a bathtub, the more expensive the bathtub will be. Whirlpool tubs are more expensive than standard bathtubs. An air-jetted bathtub is more expensive than a water-jetted bathtub. Soft bathtubs and claw-footed bathtubs are also more expensive than standard tubs. Do you want a jetted tub? If you think that opting for a whirlpool tub is an easy decision, think again. You will still be faced with deciding between air jets and water jets in the tub. Air jets are quieter than water jets. Plus, with an air-jetted bathtub, the bather can enjoy a bubble bath, bath laced with scented oils, or a bath that is generously filled with sea salts. Water jetted tubs on the other hand do not offer the same possibilities. Additionally, a bathtub with water jets will provide stronger more vigorous bursts of water, while an air-jetted bathtub will present weaker bursts of water. Alternatively, water jets are fewer in number than air jets in a tub. Since the models vary, it’s important to take notice of the placement of the jets within each particular model of jetted tub. Do you want a hard or a soft bathtub? The hard bathtub is the least expensive of all of the models. It is also the one that you find in the homes of most people. This type of bathtub usually fits into the corner of the bathroom, sits upon the floor, is rectangular in shape, and is available in a limited assortment of colors. It is also going to require a bath pillow if you intend to lounge for any period of time. On the other hand, a soft bathtub mirrors most of the above characteristics. Soft bathtubs are rectangular in shape, sit upon the floor, fit into the corner of most bathrooms, and are sold in a small variety of colors. The biggest difference is that this type of bathtub has soft cushioning and a non-slippery surface to offer to its occupants. Will a specific tub hurt the resale value of the home? Today’s bathtubs are available in a wide variety of sizes, shapes, colors, and more. Homeowners who are considering purchasing something out of the ordinary should also consider the impact such a decision could make on the resale value of the home. Is your electrical up to code for the model of bathtub that you are getting? Some of today’s more deluxe bathtubs require electrical wiring. Homeowners should always check to ensure that their existing electrical set up could support any new acquisition to the home’s furnishings Does the color blend in with the décor of your bathroom? Although the color of the bathtub might seem to be a minor concern compared to some of the other issues, it could quickly become a major one. If the color of the new tub does not blend well with the existing décor of the bathroom, you could be looking at some expensive remodeling costs. How will you dispose of your old bathtub? Disposing of an old bathtub can be difficult for some individuals. You need to discuss the removal of the old bathtub with the company from whom you are purchasing the new one. Will they take it away for a small fee? If removal is not part of the service, even for an added fee, then you need to investigate your other options such as checking with your trash removal company and scrap yards. What type of repairs are you going to have with a particular tub? Obviously, the custom designed bathtubs will be the most expensive to repair. A claw foot bathtub has exposed pipes, making plumbing repairs a relatively simple task. The jetted tubs will be the most expensive to repair, especially since electrical wiring is part of the package.
Tools You’ll Need to Replace a Bathtub
How to Install a Bathtub
Safety: You need a helper for these next few steps.
When renovating your bathroom you may run into wood that has been damaged from old water leaks, if you do properly fixing the wood at that time is important, this post will explain how to fix rotted or spongy wood.Choosing Your New Toilet for the Bathroom RemodelWhile remodeling the bathroom, there are plenty of homeowners who choose to have their old bathroom toilet replaced with a new one. Should you be needing a new bathroom toilet, there are a variety of important factors that you will need to consider. One of the factors is the other remodeling which is being undertaken. If you are planning on remodeling the rest of your bathroom, you will want to make sure that you pick a bathroom toilet that will complement the rest of your soon to be newly remodeled bathroom. Having everything match, from the toilet to the floor tiles, is truly one of the most effective ways to create a beautiful bathroom. In the United States, most of homes have a standard toilet in them. Standard toilets are another way of describing traditional model toilets. Most standard model toilets come in white and they are, well, simply standard. If you happen to be remodeling the bathroom on a budget, you will be able to benefit from the purchase a standard model bathroom toilet. Standard bathroom toilets tend to be known as being the least expensive of all bathroom toilet models. While you might be shopping with limited funds, you may also be shopping for the best toilet around. When that is the case, you may be searching for something different, say something a bit more stylish. In that case, you will be able to discover it, with a little bit of research. 7 Tips to Choosing the perfect toilet
o In gravity fed toilets, the weight of the water from the tank pushes the waste through an S shaped trap way, as the siphon that is created empties the bowl. o With pressure assisted toilets, air in the tank is compressed as it fills with water. When flushing, the pressurized air pushes the water more strongly into the bowl, resulting in a better flush. Disadvantages, though, include greater noise, expense and difficulty of repairing.
When choosing a new toilet for your next bathroom remodeling project, it is important to be concerned with the appearance of a toilet, but it also important to be concerned with the cost of one. Although it is possible to purchase a standard toilet for only a few hundred dollars, you need to keep additional costs in mind. As you likely already know, bathroom toilets are heavy; therefore, you may need assistance getting your toilet into your home. Depending on where you shop, you may be able to get free delivery, but you should also be prepared for a small delivery fee. Also, if you need assistance with installation, you will need to keep installation costs in mind. As you can see, there is a large amount of decision making that does into choosing your next bathroom toilet. Even though it may take a little bit of research and time, to find the perfect toilet, the results will almost always be worth it
Installing your new toiletMost toilets are sold with the necessary gaskets, washers, and hardware for fitting the tank to the bowl. However, you might need to buy a few parts. Here is a list of what you need to complete this task: Parts:
Tools:
5 Steps to Installing Your Toilet
Maintenance for Your New Toilet:At least twice a year clean out the inside of your toilet tank. When cleaning the toilet tank, turn off the water, flush toilet once, add small amount of cleaning detergent inside tank to water remaining and use a cloth or brush to clean. Also clean out holes under toilet seat and rim of the bowl as well as the 3/4″ hole in the bottom of toilet bowl. Replace rubber tank ball at this time if needed. Maintaining your new toilet will keep the plumber away and reduce your plumbing bill. Check Out: 5 Quick Fixes for Your Home’s Bathroom if you can’t afford a full renovation.Picking the Right Bathroom CabinetsWhen it comes time for you to choose bathroom cabinets you have a lot to think about; you not only have to choose bathroom cabinets with a style that you like, but you need to choose cabinetry that is going to make your bathroom functional. You also need to consider the size of the cabinets, the materials the cabinets are made of, and the theme of your bathroom design. Here are some tips for making the act of choosing cabinets for your bathroom a bit easier. First, you will want to define how many cabinets you want and the size of the cabinets you need. Do you want a base cabinet, a medicine cabinet, a standalone cabinet, or a combination of all of the latter? Figure out where you plan to install or place a cabinet in your bathroom and measure the area so you know the dimensions of the bathroom cabinets you require. You not only need to know the height of the cabinet you need, but you will have to measure the depth of the cabinet area too. In terms of style, you have a lot to choose from; bathroom cabinetry includes closed cabinetry like medicine chests, recessed cabinetry, wall cabinetry, and base or vanity offerings. You can also get bathroom cabinets that are open and that have a lot of shelving. Standalone offerings include linen cabinets, towers, and storage cabinetry too. You will need to reflect on what you plan on storing in your bathroom now and in the future. Do you want cabinetry for medicines and personal items? Do you want cabinetry for your linens and towels? You should think about these issues as you shop. For more advice on bathroom cabinets, check out our Bathroom Cabinets GuidePick the Right Bathroom FaucetBathroom faucets come in various colors, styles and shapes. There is something out there for everyone. You may be interested in the stainless steel, most traditional look. But, do not over look the other options out there too such as the brass and brushed nickel versions. Even chrome is a good choice for a faucet in some homes. To find the right one for your home, consider the benefits of choosing one over the other. There are many things that can help persuade you one way or the other. All about Stainless Steel FaucetsThe most traditional and probably the most common bathroom faucet is that of stainless steel. These are long lasting products that will provide you with a blend of materials, namely steel alloys and chromium. These are the least expensive of products and offer a wide range of looks as well. The benefits of this product are simple. They will last a long time because they do not rust. They are easy to clean. They match virtually any décor that you put them into. You never really need to do any updating of the metal. On the other hand, there are some negatives to think about too. For example, bathroom faucets made from stainless steel are often the most likely to show fingerprints on them. They can be scratch, which can lead to rusting in those locations. They can become dull in appearance, too. All about Chrome FaucetsAnother option for faucets that you have is chrome. Chrome is actually created over solid brass fixtures that have a process called electroplating done to them. The coloring of chrome is the same silver from your stainless steel, mostly. They are affordable options and you will find that some of the more high end, fancy versions are expensive. There are many benefits of investing in chrome for your faucets. For example, they do not scratch and therefore do not rust. They also are going to last you a long time without showing too many signs of aging. Chrome will show water spots but they can easily be cleaned off. If you over clean the chrome or use abrasive chemicals on it, it can become dull over time because of chrome finish will wear off. All about Brushed Nickel FaucetsYet another option for faucets is brushed nickel. This is one of the newest products out there and is made by electroplating which is done over the top of solid brass. There are many options to consider in styles because they are so popular. What’s more, there is a range of pricing including affordable products. The benefits of this product are that they do not show scratches and fingerprints are easily hidden. They do not tarnish over time. The downfall that they have is that the plating can wear away over a long period of time. Choosing the best bathroom faucets means to consider all of these options carefully. Once you have selected the right faucet, replace it yourself following this guideTips to Choose the Right Bathroom SinkBathroom sink comes in very wide variety of shapes, designs, colors and price range. It could be daunting task to buy one if you have not prepared yourself in advance. Here are some tips to prepare you in choosing the appropriate sink for your bathroom.
Steps to Replacing Your Bathroom SinkFirst, you must gather all the tools and materials needed to complete the job. Tools needed to replace sink
Seriously THAT is all the tools you’ll need.
17 Steps to Replacing Bathroom Sink1. Go underneath the sink. Turn off the water. Loosen the collar nuts on the drainpipe. 2. Drain any excessive water, and then remove the drainpipe. 3. Loosen the nuts that hold the pop-up assembly in place under the sink using slip-joint pliers. 4. Unscrew the pop-up flange in order to free the assembly underneath the sink. 5. Remove the fittings that join the supply lines of the old faucet to the shutoff valves, using a wrench. 6. Repeat the steps 4-15 as explained above for replacing kitchen faucet. 7. Now, you have to install the pop-up assembly. 8. Push the pop-up rod down through the body of the faucet. 9. Attach the flat bar. 10. At the bottom of the new flange, use a little plumber’s putty to hold the tailpiece so that the whole assembly protrudes up through the drain hole in the sink. 11. Spin the ring to position the same with the tailpiece under the sink. 12. In order to secure pop-up housing in place, tighten the nut on top of the tailpiece. 13. Hook up the pop-up lever onto the flat bar in order to secure it to the pop-up housing. 14. Drop the stopper into the drain hole. 15. Replace the drainpipe. 16. Tighten the collar nuts. 17. Turn on the faucet and check for leaks. Bathroom Flooring: Pick the Right KindThere are many things that need to be taken into consideration when choosing the floor for your bathroom. You often go barefoot in the bathroom, for instance, so the feel of its floor is just as important as the way that it looks. Below, an overview of the most popular materials for bathroom floors is outlined for your convenience; a few key tips are included, too. Make a Small Bathroom Look Larger with the Right Kind of FloorMost people have to deal with bathrooms that are relatively small. There’s just no getting around it. However, there are ways to make a small bathroom look a lot larger. One of the best ways to do so is by choosing your flooring with care. A light-colored floor is one of the simplest yet most dramatic ways to give a small bathroom a much more spacious look and feel. Better still, use similar tones for the walls and the floor to create the illusion of a lot more space. Why Ceramic Works Best If you’re looking for a bathroom floor material that is affordable, attractive and easy on bare feet, you should make a beeline for ceramic. This type of floor material can include many unique textures and designs that go along with virtually any interior design scheme. Ceramic is wonderfully waterproof, too, which is a critical point when it comes to designing a bathroom – nothing is worse than stepping onto a damp, soggy floor. Ceramic tiles are available in a breathtaking array of different styles, sizes and designs, too, making it a snap to get the look that is right for you. Check out theBathroom Tile Selection Guide for more ideasVinyl: A Suitable Choice Vinyl feels great underfoot; it’s also very waterproof and a snap to maintain. Best of all, vinyl flooring is very affordable. A wide variety of different patterns and designs are available, making it a versatile and exciting choice for the bathroom. Put vinyl near the top of your list if you want to stick to a strict budget while still achieving a stylish and attractive look. Learn how to lay vinyl flooring in this postThe Trouble with Marble Some people believe that marble is the be-all, end-all in terms of bathroom floors. However, marble is a highly porous material; it is also very soft. What that means is that it absorbs and retains moisture with ease. In the bathroom, that can spell major trouble. As beautiful and luxurious as marble may be, it is generally not a suitable choice for the bathroom. Why Carpeting isn’t Ideal for the Bathroom While it’s fine to throw down a few colorful rugs in a bathroom, having wall-to-wall carpeting installed isn’t a very smart move. Carpet needs to stay as dry as possible; even if you are a stickler about not stepping onto your carpet with sopping wet feet, the moisture in the air will wreak plenty of havoc. While carpet feels wonderful beneath the feet, it just isn’t a practical choice for the bathroom. Invest in a few cute area rugs and leave the carpeting for other parts of the home. Want Wood? Try Laminate Flooring Instead The idea of a luxurious wood floor in the bathroom may sound great, but it is fraught with all sorts of issues. A wood floor must be impeccably installed in order to stand a chance in the bathroom, where moisture and standing water can destroy it in no time flat. Plus, wood must be finished in a precise way in order to make a go of it. If you’d like the look of wood in a material that can withstand the perils of the bathroom, laminate flooring may be for you. It is available in many wood-style finishes that will make your bathroom look amazing. Hopefully you find this bathroom remodeling guide helpful. Here at All Around the House we are dedicated to total home improvement. Please share your before and after bathroom remodeling photos in the comments.
The post Bathroom Remodeling; Ultimate Guide appeared first on All around the house. from http://allaroundthe.house/remodeling-bathroom-guide/ |
ABOUT USHiking Camping World is the best place to learn about hiking and camping. Get all the guides to enjoy the outdoors. ArchivesNo Archives Categories |